Building Web front end for Python scripts with Flask#
Recently I revived my relationship with Python in an effort to tackle the routine tasks appearing here and there. So I started to write some pocket scripts and, luckily, was not the only one on this battlefield - my colleagues also have a bunch of useful scripts. With all those code snippets sent in the emails, cloned from the repos, grabbed on the network shares... I started to wonder how much easier would it be if someone had them all aggregated and presented with a Web UI for a shared access?
Thus, I started to build web front-end to the python scripts we used daily with these goals in mind:
- allow people with a zero knowledge of Python to use the scripts by interacting with them through a simple Web UI;
- make script's output more readable by leveraging CSS and HTML formatting;
- aggregate all the scripts in one a single repo but in a separate sandboxed directories to maintain code manageability.
This short demo should give you some taste of what it is:
Disclaimer: I am nowhere near even a professional python or web developer. And what makes it even worse is that I used (a lot) a very dangerous coding paradigm - SDD - Stack Overflow Driven Development. So, hurt me plenty if you see some awful mistakes.
PLAZA (this is the name I gave this project) implements a straightforward user experience flow: a user opens a web page, selects a script from the menu, fills in the necessary input data and run a script to get the results back.
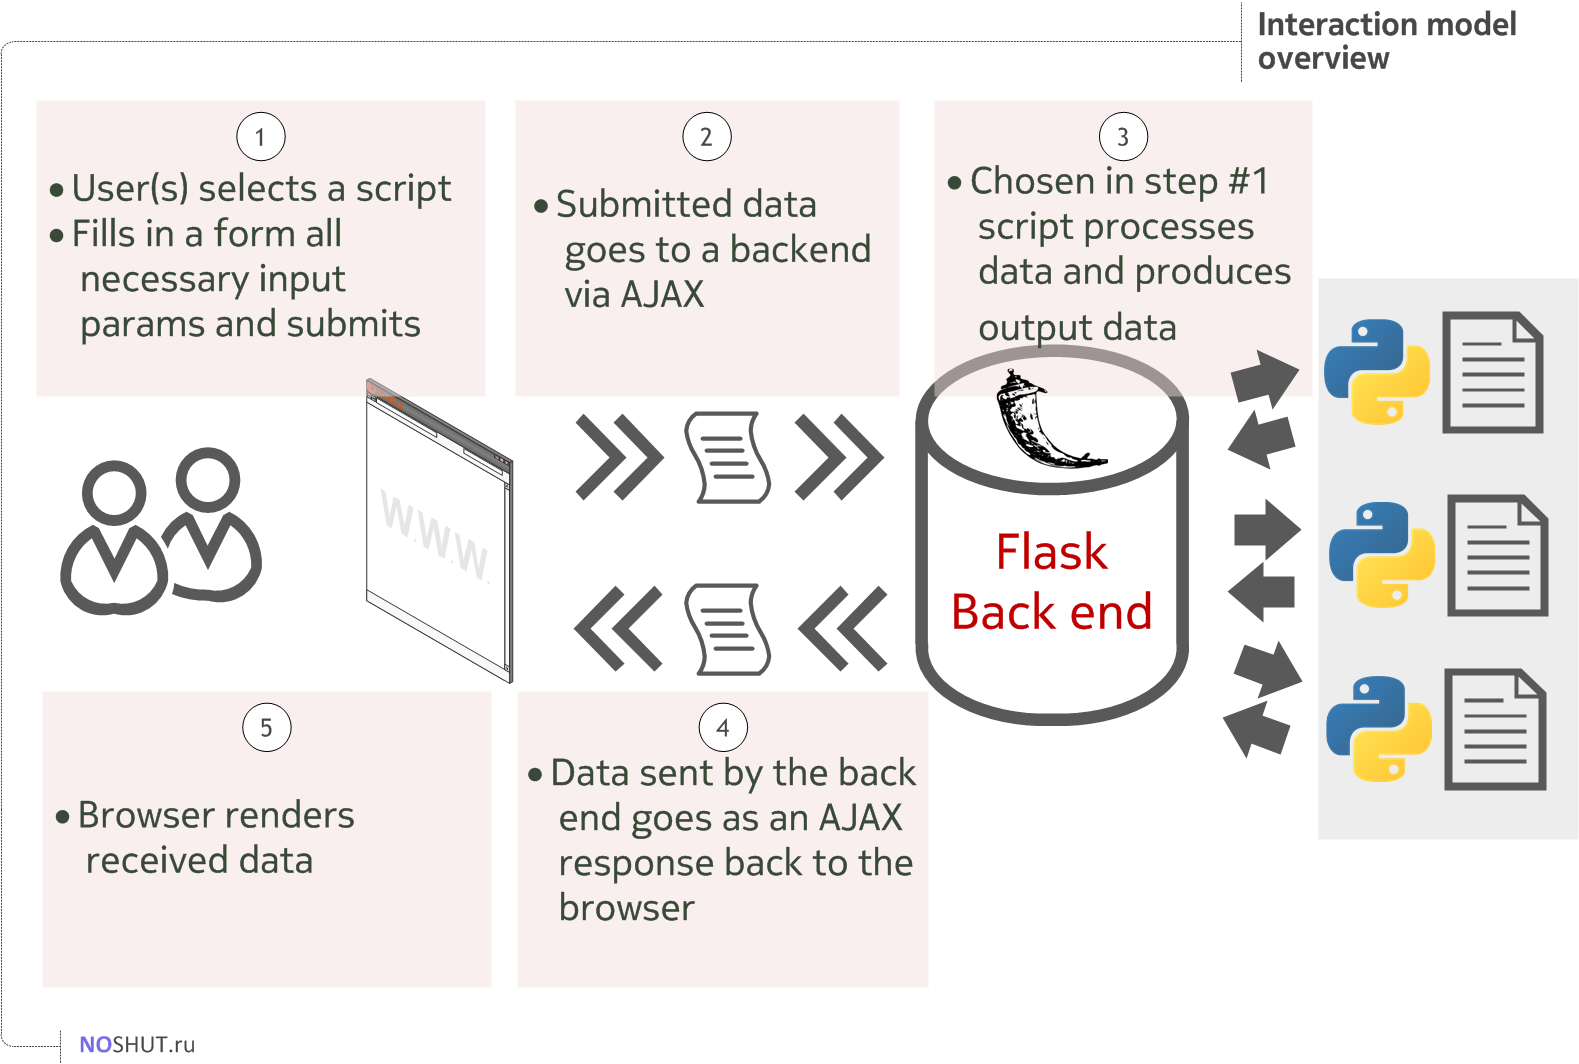
By hitting submit data goes to the back-end part, where the chosen python script does it's noble job and produces some data. This data gets pushed back to the browser and as displayed to a user.
Obviously, one will need some front-end technologies to build the web layer and some back-end to process the incoming data.
Tools & Technologies#
Front-end#
To build a fairly fresh-looking (fresh as in 2016yr), dynamic web view we need a web framework to leverage. I used Bootstrap package (CSS and JS) as it is well documented and have tons of implementations and examples.
What tastes good with Bootstrap - JQuery, of course. JQuery was used to handle AJAX response/request messages between the front-end and the back-end without reloading the whole page. Since I had no previous experience with both of these technologies, I heavily used everything google served me. Here is my list of useful resources I found noteworthy:
- Layoutit.com - there you can create Bootstrap grid and play with elements in a drag and drop fashion. Load the result in a zip file and your grid system is almost ready.
- Form validator by 1000hz - well, it's a form validator. And since every script needs to get input data from a user, form validation is a must-have for a sleek user experience.
- Bootsnipp.com - crowdsource collection of snippets written with Bootstrap. I grabbed my side menu from it. Another useful section from this site is Form Builder.
- Formden - another form builder.
Back-end#
The heavy lifting in the back is done by the gorgeous Flask, which is a micro framework for writing web applications. It includes a web-server, Jinja2 templating engine and lots of features to make back-end easy even for dummies like me.
As to the Flask related resources I cherry-picked the following:
- Famous Flask Mega Tutorial by Miguel Grinberg
- Discover Flask - A full season of youtube videos from Michael Herman
- Official documentation of course!
- Another good post on AJAX+Flask interaction from giantflyingsaucer.com
Project structure overview#
Having frameworks set and tools figured out I started to outline the project's high-level structure.
Flask maintains a simple yet flexible project structure. In my case, I didn't deviate far away from a basic setup, since the overall simplicity is one of the project's objectives.
├── app.py        # Flask application
├── config.py     # Flask configuration
├── .env          # env variables for dev/prod environments
├── scripts_bank  # directory to store all python scripts we're going to use via Web
├── static        # static data for Bootstrap CSS, JS, custom fonts, etc
│   ├── css
│   ├── fonts
│   └── js
├── templates     # HTML templates used to render pages</pre>
Although the comments above give enough information about the structure, let's go into details a bit
- Flask application -
app.py- is an entry point for the whole project. It starts the web-server, loads theroutes(aka links to the pages of your web project) and plugs in python scripts stored in thescripts_bankdirectory. - As every other app, Flask app should be configured differently for development and production. This is done via the
config.pyand the environment variables.envfile. - In the
staticdirectory you normally store your CSS, JS, pictures, custom fonts. So did I. - HTML pages are in the
templatesdirectory. - And the pythonic scripts with all the relevant files (unique HTML templates for input forms, additional front-end Javascript code, etc) are living inside the
scripts_bankdirectory.
Configuring Flask#
Once you have Flask installed and got familiar with its basics (either through official quick start guide or tons of tutorials) it is time to configure it. There are several ways to configure a Flask application. The basic one is to specify the configuration statements as the arguments to your app instance:
app = Flask(__name__)

## pass secret_key and SQLAlchemy params
app.secret_key = 'test'
app.config[SQLALCHEMY_DATABASE_URI] = 'sqlite:///db/sql.db'

if __name__ == '__main__':
    app.run(debug=True)     ## pass DEBUG param</pre>

A bit more advanced way is to specify all the config parameters in uppercase in your `app.py` and tell the `app` instance to get config from this file:

```DEBUG = True
SECRET_KEY = 'yekterces'
SQLALCHEMY_DATABASE_URI = 'sqlite:///db/sql.db'

app = Flask(__name__)
app.config.from_object(__name__)   # get config from this module</pre>
But the methods discussed so far can't let you have different configurations for Dev and Prod environments (which you'd want to have eventually).
When I was choosing the configuration method for this app I followed a path which consists of these three key points:
- creating configuration classes for different environments using inheritance (explained here)
- choosing the right configuration class based on the current value of the environment variable
- storing environment variables in a file (
.env) and parsing its contents for parameters (more here)
Detailed explanation of Flask app configuration
Going from bottom to top,
.envis a file, which stores application parameters in a way like classic environment variables do.# This file is used to store configuration settings for # Dev and Prod environments. PLAZA_SETTINGS value is used by app.py to # properly detect which configuration class to use # uncomment/modify desired section prior to use # dev PLAZA_SETTINGS = config.Development # prod # PLAZA_SETTINGS = config.Production # HOST = 0.0.0.0</pre>Then Flask application initializes and gets configuration from a class, stored in
PLAZA_SETTINGSvariable:from flask import Flask, render_template import os import config root_folder_path = os.path.dirname(os.path.abspath(__file__)) # get env_settings list env_settings = config.EnvironmentSettings(root_folder_path) # initialize Flask app app = Flask(__name__) # configure Flask app from a class, stored in PLAZA_SETTINGS variable app.config.from_object(env_settings['PLAZA_SETTINGS']) if __name__ == '__main__': # if we are in Prod, use HOST and PORT specified try: app.run(host=str(env_settings['HOST']), port=80) except config.ConfigurationError: app.run()</pre>Functions subject to configuration along with configuration classes are stored in the
config.pyfile:import os # default config class class Base(object): DEBUG = False SECRET_KEY = 'your_secret' class Development(Base): DEBUG = True class Production(Base): DEBUG = False class EnvironmentSettings: """ Access to environment variables via system os or .env file for different environments (Prod vs Dev) """ def __init__(self, root_folder_path): self._root_folder_path = root_folder_path def __getitem__(self, key): return self._get_env_variable(key) def __setitem__(self, key, value): raise InvalidOperationException('Environment Settings are read-only') def __delitem__(self, key): raise InvalidOperationException('Environment Settings are read-only') def _get_env_variable(self, var_name, default=False): """ Get the environment variable or return exception :param var_name: Environment Variable to lookup """ try: return os.environ[var_name] except KeyError: from io import StringIO from configparser import ConfigParser env_file = os.environ.get('PROJECT_ENV_FILE', self._root_folder_path + "/.env") try: config = StringIO() config.write("[DATA]\n") config.write(open(env_file).read()) config.seek(0, os.SEEK_SET) cp = ConfigParser() cp.read_file(config) value = dict(cp.items('DATA'))[var_name.lower()] if value.startswith('"') and value.endswith('"'): value = value[1:-1] elif value.startswith("'") and value.endswith("'"): value = value[1:-1] os.environ.setdefault(var_name, value) return value except (KeyError, IOError): if default is not False: return default error_msg = "Either set the env variable '{var}' or place it in your " \ "{env_file} file as '{var} = VALUE'" raise ConfigurationError(error_msg.format(var=var_name, env_file=env_file)) class ConfigurationError(Exception): pass class InvalidOperationException(Exception): pass
Setting up front-end#
Good, Flask app has been configured and is ready to render some pages, so let's go and prepare out front-end to display projects' web pages. Download Bootstrap, JQuery, Fontawesome and store theirs minified min.css and min.js artifacts in the static directory of the project. This is how it should look like:
├── static
│   ├── css
│   │   ├── bootstrap.min.css
│   │   ├── font-awesome.min.css
│   │   └── style.css  # custom styles css for every page
│   ├── fonts
│   │   ├── FontAwesome.otf
│   │   ├── NokiaPureHeadline_ExtraBold.ttf  # custom fonts like this also live here
│   │   ├── fontawesome-webfont.eot
│   │   ├── fontawesome-webfont.svg
│   │   ├── fontawesome-webfont.ttf
│   │   ├── fontawesome-webfont.woff
│   │   ├── fontawesome-webfont.woff2
│   │   ├── glyphicons-halflings-regular.eot
│   │   ├── glyphicons-halflings-regular.svg
│   │   ├── glyphicons-halflings-regular.ttf
│   │   ├── glyphicons-halflings-regular.woff
│   │   └── glyphicons-halflings-regular.woff2
│   └── js
│       ├── bootstrap.min.js
│       ├── jquery-2.2.0.min.js
│       ├── loadingoverlay.min.js  # CSS for overlay animation.
│       ├── scripts.js             # custom JS scripts
│       └── validator.min.js       # form validation JS code
Layout#
Before diving into HTML it is advised to think about pages layout. I recommend you to get familiar with Bootstrap CSS rules and choose a layout that fits your project. I decided to go with a 3+9 scheme. Three parts are for side menu and nine parts are for a content area with a navigation bar at the top of the page.
I composed a sketch of the page depicting how I would like to see my projects web view for an arbitrary script:
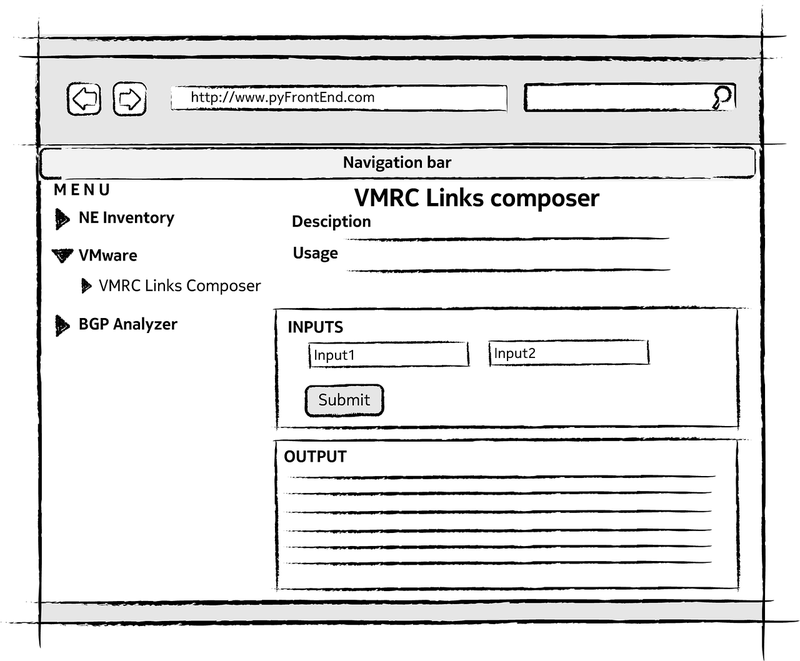
Follow the link to see my script's page template on codepen and see how things interact. Do not worry if you can't pick rock solid layout right now, you will be able to modify it on-the-fly and decide what suits your needs better.
Flask routes & templates#
Routes#
Flask uses routes to create URL's for the web pages. If we need to show the main page for example for the URL abc.com we need to define the root route - / - like this:
This will effectively bind the index() function to the route / , so when a user navigates to the application's root it will trigger the index() function.
My index() function does one simple thing, it asks Flask to render specific template - index.html.
Templates#
You might guess that a template has to do something with the HTML content rendered by a browser. Yes, it has, but it is far more powerful than a static HTML file.
Generating HTML from within Python is not fun, and actually pretty cumbersome because you have to do the HTML escaping on your own to keep the application secure. Because of that Flask configures the Jinja2 template engine for you automatically.
So Flask's template is a Jinja2-based template which allows you to build dynamic web-pages instead of a static content. To render a template you can use the render_template() method. All you have to do is to provide the name of the template and the variables you want to pass to the template engine.
You can name your templates as you like, but normally it will have an .html extension to reflect their purpose. This is my index.html template mentioned earlier bound to the route /.
{% extends 'base.html' %}
{% block content %}
 <h2> Welcome to <span class="text-primary">PLAZA</span>. <small>front-end for python scripts we used to run from console</small></h2>
 <h3 class="text-primary">
  What is PLAZA?
 </h3>
 <p >
  PLAZA is a web front-end to python scripts built with these goals in mind:
  <ul>
   <li>allow people with zero python knowledge to use the scripts by interaction through simple Web GUI;</li>
   <li>beautify scripts' output with modern CSS and HTML formatting;</li>
   <li>aggregate all the scripts in one repo but in a separate sandboxed directories to increase code manageability.</li>
  </ul>
 </p>
<h3 class="text-primary">
  How to use?
 </h3>
 <p >
  Navigate through the side menu to the desired script and follow the instructions.
 </p>
<h3 class="text-primary">
  Contacts
 </h3>
 <p >
  Have any ideas, questions, problems? Visit <a href="/contacts">contacts</a> page for all the details.
 </p>
{% endblock %}
And this is how it gets rendered:

Dynamic version of the index page can be found on the codepen as well. The trick behind that magic template->rendered page transformation is in the first two lines. This is template inheritance magic - {% extends 'base.html' %} - and that is what makes templating so powerful.
Template inheritance#
Inheritance drill described briefly in the official documentation and the main part of it sounds like this:
Template inheritance allows you to build a base “skeleton” template that contains all the common elements of your site and defines blocks that child templates can override.
Apart from the official docs, you can watch this video from the “Discover Flask” series to better understand how does template inheritance work.
Main template#
One of the best practices regarding template inheritance is to compose a base template or a layout for the whole site so every other template will inherit from it. My "main" template is called base.html and it describes the logical parts for each page in this project.
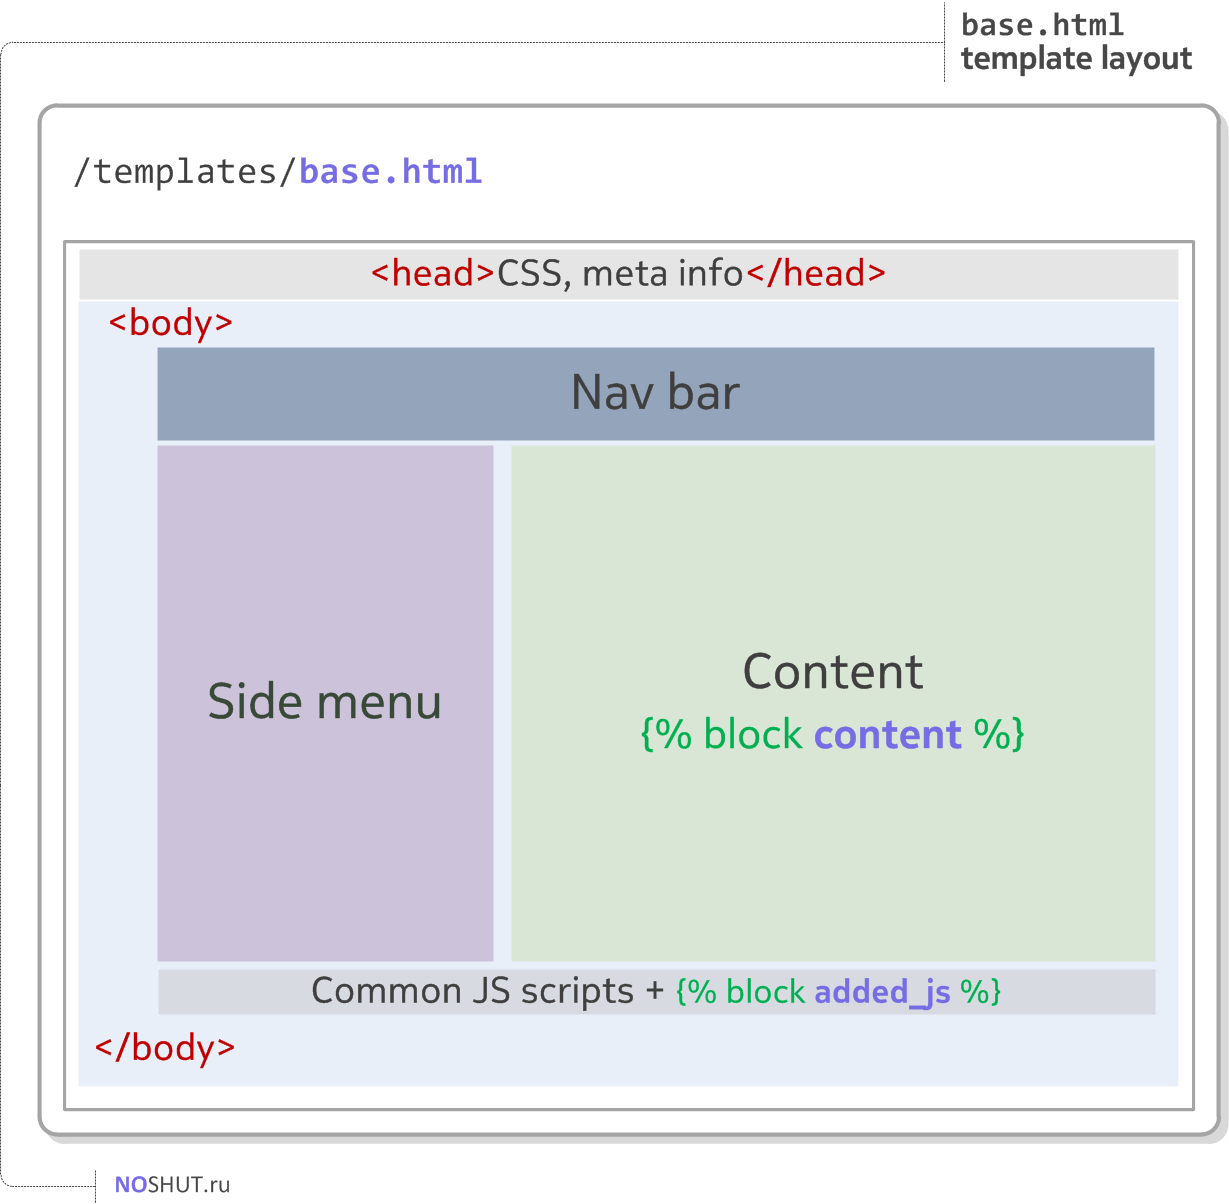
The main template consists of the static parts like Navbar, side menu, it also connects core CSS, JS and fonts. And finally, it specifies where would child template's content be placed.
<!DOCTYPE HTML>
<HTML lang="en">
<head>
<meta charset="utf-8">
<meta http-equiv="X-UA-Compatible" content="IE=edge">
<meta name="viewport" content="width=device-width, initial-scale=1">
<title>PLAZA Project</title>
<meta name="description" content="NOKIA Launchpad for scripts">
<meta name="author" content="Roman Dodin">
<link href="/static/css/bootstrap.min.css" rel="stylesheet">
<link href="/static/css/style.css" rel="stylesheet"> <!-- custom CSS -->
<link href="/static/css/font-awesome.min.css" rel="stylesheet">
</head>
<body>
<!-- NAV BAR -->
<div class="navbar navbar-nokia navbar-fixed-top">
<div class="container">
<div class="navbar-header">
<button type="button" class="navbar-toggle" data-toggle="collapse" data-target=".navbar-collapse">
<span class="icon-bar"></span>
</button>
<a class="navbar-brand" href="/">PLAZA</a>
</div>
<div class="collapse navbar-collapse">
<ul class="nav navbar-nav">
<li>
<a href="#contact">Contact</a>
</li>
<li>
<a href="#modalSearch" data-toggle="modal" data-target="#modalSearch">
Search <span id="searchGlyph" class="glyphicon glyphicon-search"></span>
</a>
</li>
</ul>
</div>
<!--/.nav-collapse -->
</div>
</div>
<!-- NAV BAR -->
<!-- Search Modal (http://www.w3schools.com/bootstrap/bootstrap_modal.asp) -->
<div id="modalSearch" class="modal fade" role="dialog">
<div class="modal-dialog modal-lg">
<!-- Modal content-->
<div class="modal-content">
<div class="modal-header">
<button type="button" class="close" data-dismiss="modal">×</button>
<h4 class="modal-title">Search PLAZA (under development)</h4>
</div>
<div class="modal-body">
<!-- Add the modal body here -->
</div>
<div class="modal-footer">
<button type="button" class="btn btn-default" data-dismiss="modal">Close</button>
</div>
</div>
</div>
</div>
<div class="container">
<div class="row">
<div class="col-md-3">
<div class="nav-side-menu">
<div class="brand">MENU</div>
<i class="fa fa-bars fa-3x toggle-btn" data-toggle="collapse" data-target="#menu-content"></i>
<!-- START OF SIDE MENU AREA-->
<div class="menu-list">
<ul id="menu-content" class="menu-content collapse out">
<!-- PLACEHOLDER FOR ELEMENT W/O CHILDREN
<li>
<a href="#">
<i class="fa fa-angle-right fa-fw"></i>Element wo children
</a>
</li>
-->
<li data-toggle="collapse" data-target="#5620sam" class="collapsed">
<a href="#">
<i class="fa fa-angle-double-right fa-fw chevron-rotate"></i>5620 SAM
</a>
</li>
<ul class="sub-menu collapse out" id="5620sam">
<li>
<i class="fa fa-angle-right fa-fw"></i>
<a href="/5620SAM/SAM-O_XML_API_Tester">
SAM-O XML API Test Engine
</a>
</li>
</ul>
<li data-toggle="collapse" data-target="#vmware" class="collapsed">
<a href="#">
<i class="fa fa-angle-double-right fa-fw chevron-rotate"></i>VMWare
</a>
</li>
<ul class="sub-menu collapse out" id="vmware">
<li>
<i class="fa fa-angle-right fa-fw"></i>
<a href="/vmware/get_vmrc_links">
VMRC Link Composer
</a>
</li>
<li data-toggle="collapse" data-target="#products2" class="collapsed">
<i class="fa fa-angle-double-right fa-fw chevron-rotate"></i>
<a href="#">Placeholder-sublevel1
</a>
</li>
<ul class="sub-sub-menu collapse out" id="products2">
<li class="sub-level2">
<i class="fa fa-angle-right fa-fw"></i>
<a href="#">
Placeholder-sublevel2
</a>
</li>
</ul>
</ul>
</ul>
</div>
</div>
</div>
<!-- END OF SIDE MENU AREA -->
<!-- START OF CONTENT AREA -->
<div class="col-md-9">
{% block content %}{% endblock %}
</div>
<!-- END OF CONTENT AREA -->
</div>
</div>
<script src="/static/js/jquery-2.2.0.min.js"></script>
<script src="/static/js/bootstrap.min.js"></script>
<script src="/static/js/scripts.js"></script> <!-- custom JS -->
<script src="/static/js/validator.min.js"></script> <!-- https://github.com/1000hz/bootstrap-validator -->
<script src="/static/js/loadingoverlay.min.js"></script> <!-- http://gasparesganga.com/labs/jquery-loading-overlay/-->
{% block added_js %}{% endblock %} <!-- block for JS added on pages on demand -->
</body>
</HTML>
I marked the lines on which child template insertion occurs. Once again, read the docs on templating, read some blogs and you will catch it quickly.
Child template#
Once you have the base template figured out you are ready to create it's successors - child templates. A while back I showed you the /templates/index.html template where the following construct
effectively told Flask to extend base.html content section with some code relevant to this particular index.html page.
Intermediate templates and multiple inheritances#
It is also possible to inherit more than once. See what I did for the pages with actual python scripts input and output forms:
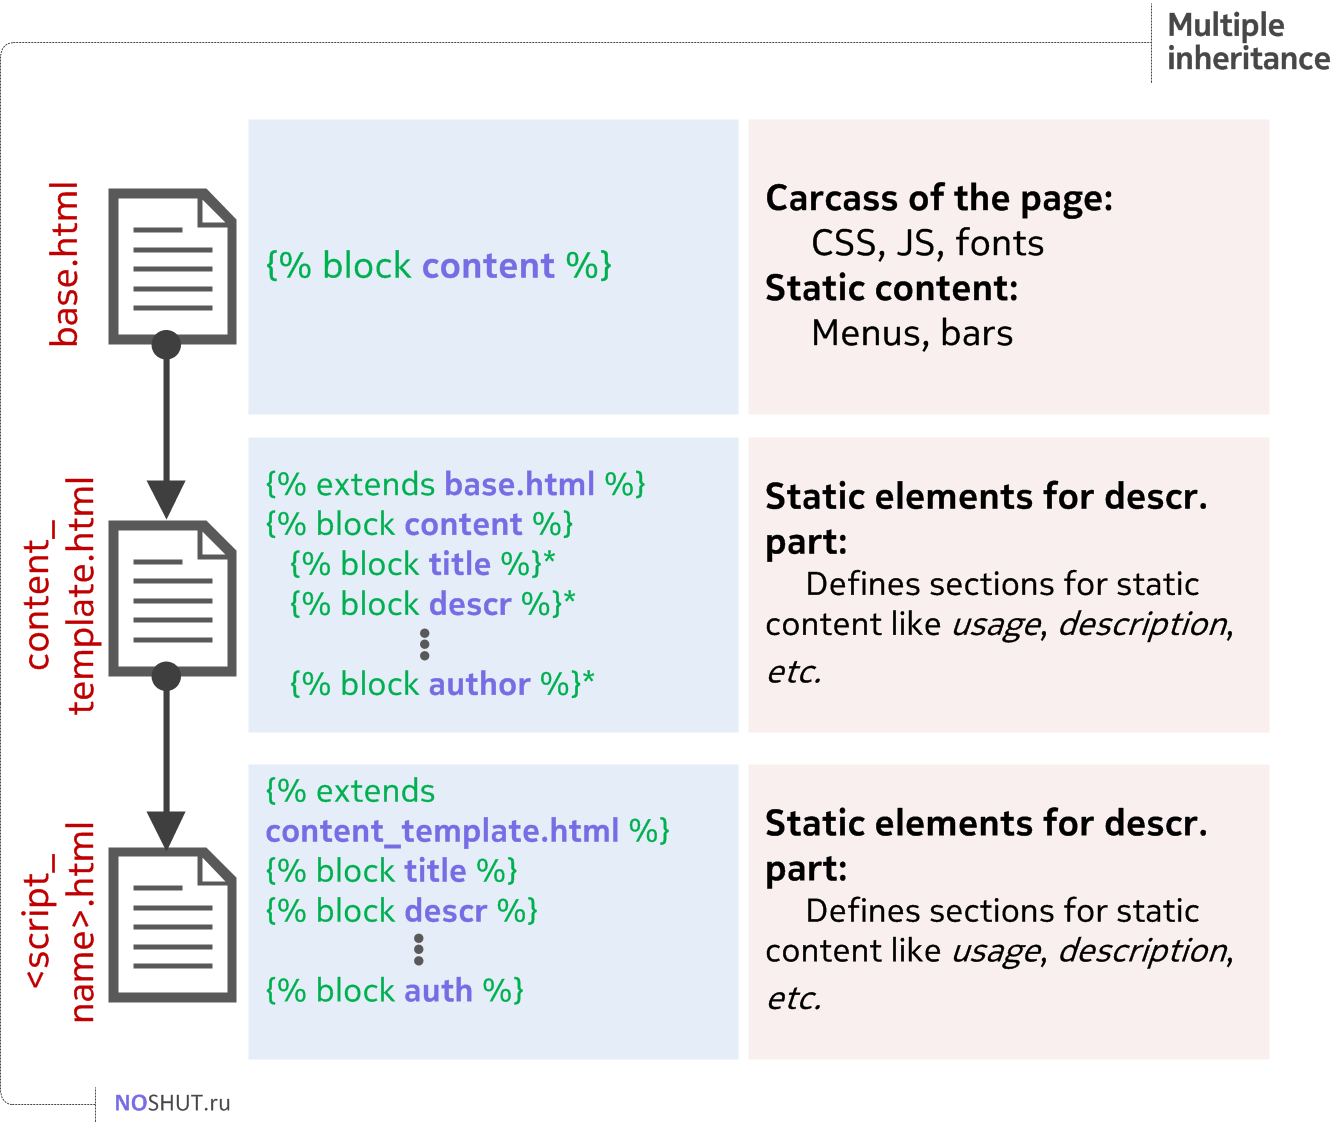
As you will see shortly after - my user-facing scripts' page has some static sections like Description, Usage, Limitations, Author , etc. Normally, all of these sections will appear on every page thus it would be nice to move all this static and repetitious content to a separate template.
That's how content_template.html was born. In this template I define blocks with names corresponding to the static sections.
The last bit of this puzzle is the template <script_name>.html which extends content_template.html and fills in all the data into blocks defined in his parent template. This template will be spawned each time a new script will be added. In the example below I demo the template called get_vmrc_links.html that is used for a particular script.
Content_template.html:
{% extends 'base.html' %}
{% block content %}

<h2 class="text-primary">
    {% block title %}{% endblock %}
</h2>

<p class="lead" >
    {% block main_purpose %}{% endblock %}
</p>

<h3>
    Description
</h3>
    <p>{% block descr %}{% endblock %}</p>

<h3>
    Usage
</h3>
    <p>{% block usage %}{% endblock %}</p>


<h3>
    Limitations
</h3>
    <p>{% block limitations %}{% endblock %}</p>

<!-- Author and info block -->
<small>
<dl class="dl-horizontal">
  <dt>Author</dt>
  <dd>{% block author %}{% endblock %}</dd>

  <dt>Version</dt>
  <dd>{% block version %}{% endblock %}</dd>

  <dt>Tags</dt>
  <dd>{% block tags %}{% endblock %}</dd>
</dl>
</small>

    {% block script_content %}<!-- Custom HTML for scrip -->{% endblock %}

{% endblock %}

{% block added_js %}<!-- Custom JavaScript for a script page-->{% endblock %}</pre>
templates/get_vmrc_links.html:
{% extends 'content_template.html' %}
{% block title %}
VMRC Links Composer
{% endblock %}
{% block main_purpose %}
This script composes clickable links for VMWare Remote Console (VMRC) standalone client along with basic info
about VMs on a ESXi host or vCenter.
{% endblock %}
{% block descr %}
It became quite a pain to get Web-based console working on ESXi hosts or vCenter servers (<=v.5.5) with
<a href="http://kb.vmware.com/selfservice/microsites/search.do?language=en_US&cmd=displayKC&externalId=2114800">deprecation of NPAPI</a>
plugins in modern browsers. An easy method to get a remote console access would be to use a standalone
<a href="http://kb.vmware.com/selfservice/microsites/search.do?language=en_US&cmd=displayKC&externalId=2091284">Virtual Machine Remote Console client (VMRC)</a>
which is available for free for major OSes.
<p>For standalone VMRC client to work a special link has to be composed - <br/>i.e. <code>vmrc://[email protected]:443/?moid=vm-13</code></p>
This script generates such links and is based on an appropriate <a href="http://noshut.ru/2016/01/getting-vmrc-links-with-python/">console version</a>.
{% endblock %}
{% block usage %}
Script works both with independent ESXi hosts and managed by vCenter. Select desired entity from the
<code>Known hosts</code> select element or specify ESXi/vCenter IP address along with
credentials of the user with root privileges and you are good to go.
{% endblock %}
{% block limitations %}
In rare cases the script couldn't compose the whole link, in that case use the <code>moID</code> value specified in the
output section to compose VMRC link manually.
{% endblock %}
{% block author %}
Roman Dodin
{% endblock %}
{% block version %}
0.1
{% endblock %}
{% block tags %}
VMWare, VMRC
{% endblock %}
{% block script_content %}
<div class="container-fluid">
<div class="row">
<div class="col-md-12">
<div class="panel panel-default">
<div class="panel-heading">
<h3 class="panel-title">Inputs</h3>
</div>
<div class="panel-body">
<!-- FORM -->
<form data-toggle="validator" role="form" method="post"> <!-- validation form http://1000hz.github.io/bootstrap-validator/ -->
<div class="form-group col-md-12">
<label class="control-label" for="known_hosts_select">
Known hosts
</label>
<select class="form-control" id="known_hosts_select">
<option>-- List of known hosts --</option>
<option ip="172.17.255.254" login="root" pass="test_pass">vCenter (172.17.255.254) -- vCenter</option>
<option ip="172.17.255.253" login="root" pass="test_pass">ESXi (172.17.255.253) -- ESXi host</option>
</select>
</div>
<div class="form-group col-md-12">
<label class="control-label requiredField" for="vmware_ip_addr">
ESXi/vCenter IP address
</label>
<input class="form-control" type="text"
pattern="^(?:(?:25[0-5]|2[0-4][0-9]|[01]?[0-9][0-9]?)\.){3}(?:25[0-5]|2[0-4][0-9]|[01]?[0-9][0-9]?)$"
id="vmware_ip_addr" name="vmware_ip_addr" placeholder="i.e. 172.17.255.255"
data-error="How did you pass NRS I? it's not a valid IP address" />
<div class="help-block with-errors"></div>
</div>
<div class="form-group col-md-6">
<label class="control-label requiredField" for="vmware_login">Login
</label>
<input class="form-control" id="vmware_login" name="vmware_login" placeholder="root" type="text" required/>
</div>
<div class="form-group col-md-6">
<label class="control-label requiredField" for="vmware_pass">Password
</label>
<input class="form-control" id="vmware_pass" name="vmware_pass"
placeholder="password" type="password" required/>
</div>
<div class="form-group col-md-12">
<div> <!-- RD: type="submit" changed to button, since JQuery is in use -->
<button class="btn btn-primary" id="submit_form" name="submit" type="button">
Submit
</button>
</div>
</div>
</form>
</div>
</div>
<!-- OUTPUT SECTION -->
<div class="panel panel-default">
<div class="panel-heading">
<h3 class="panel-title">Output</h3>
</div>
<div class="panel-body" id="output_div">
</div>
</div>
<!-- END OF OUTPUT SECTION -->
</div>
</div>
</div>
{% endblock %}
{% block added_js %}
<script src="{{ url_for('get_vmrc_links.static', filename='get_vmrc_links.js') }}"></script>
{% endblock %}
Rendered page: 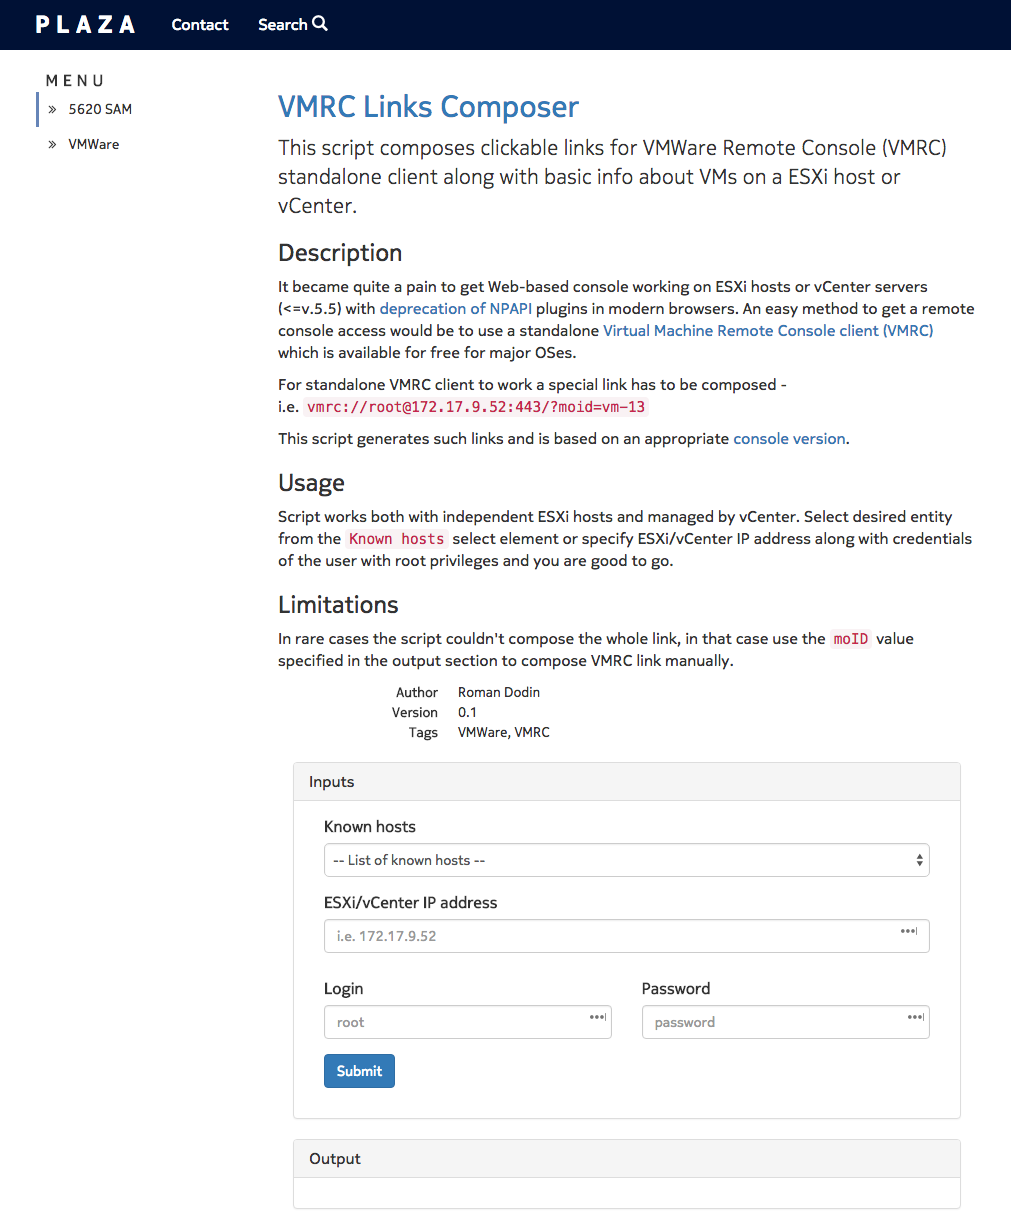
Dynamic template: http://codepen.io/hellt/pen/PNJwxq
Flask Blueprints#
Another project's major building block is Blueprint. Blueprints are important and actually making it possible to isolate various scripts in their appropriate sandboxes. And by sandbox I mean separate directory which hosts all the files linked to the script.
Take a look inside scripts_bank directory which will host all the scripts-related files:
├── scripts_bank
│   └── vmware
│       ├── __init__.py
│       └── get_vmrc_links
│           ├── __init__.py
│           ├── get_vmrc_links.py
│           ├── static
│           │   └── get_vmrc_links_scripts.js
│           └── templates
│               └── get_vmrc_links.html
It's the blueprints which allow us to modularize the app by storing some of it's components in the different directories and still be able to link them up to the main Flask app. See how elegantly JS code along with CSS styles needed only by this particular application get_vmrc_links found their's place in a separate directory - /scripts_bank/vmware/get_vmrc_links/!
Blueprint creation#
To create a Blueprint I placed this code in the get_vmrc_links.py:
get_vmrc_links_bp = Blueprint('get_vmrc_links', __name__, template_folder='templates', static_folder='static',
                              static_url_path='/get_vmrc_links/static')

@get_vmrc_links_bp.route('/get_vmrc_links', methods=['GET','POST'])
def get_vmrc_links():
 # some code
When I created a blueprint I defined it's static_url_path to /get_vmrc_links/static . But don't get confused if you don't see this path, I don't have it. That is because blueprints can be registered from a specific point and not directly from the project's root.
Once we have Blueprint created we need to bind it to the route (line 4 in the snippet above). And again the route /get_vmrc_links will have it's root at the directory where Blueprint will be registered later.
Register a blueprint#
To register the blueprint navigate to the main app.py and add the following lines:
from scripts_bank.vmware.get_vmrc_links.get_vmrc_links import get_vmrc_links_bp
app.register_blueprint(get_vmrc_links_bp, url_prefix='/vmware')
Registration is easy! Have you spotted the url_prefix='/vmware' part? This is the Blueprints root directory I was talking about! So now you can glue the parts in a whole picture.
- Blueprint's root directory is
/vmware - It's static directory path is
/get_vmrc_links/staticwhich turns to/vmware + /get_vmrc_links/static == /vmware/get_vmrc_links/static - The Flask route
/get_vmrc_linkstransforms to/vmware/get_vmrc_linksand by following this URL the script's page will be rendered
Front-end<->back-end data exchange#
To pass data back and forth between front-end and back-end we need to:
- (@front-end) serialize data from the input elements
- (@front-end) pass this data to the back-end
- (@back-end) receive data, make calculations, construct a response, send it
- (@front-end) receive a response and render it in the output form, handle errors
Serializing input data#
Serializing is not hard at all. Since it is a front-end's task it is done by the JS code which is also stored in a separate file unique to this particular script /scripts_bank/vmware/get_vmrc_links/static/get_vmrc_links.js.
This example shows you how you separate one script from another by maintaining all related files in a script's folder, in this example I'm working on get_vmrc_links script, so all the JS and specific HTML templates are stored under /scripts_bank/vmware/get_vmrc_links/ directory.
Take a look at get_vmrc_links.js and pay attention to $('#submit_form').click(function(). This function handles things occurring on on-click event to the Submit button.
/scripts_bank/vmware/get_vmrc_links/static/get_vmrc_links_scripts.js:
// filling data to the input elements based on selection of predefined hosts
$('#known_hosts_select').change(function () {
    $("#vmware_ip_addr").val($('#known_hosts_select option:selected').attr('ip'));
    $("#vmware_login").val($('#known_hosts_select option:selected').attr('login'));
    $("#vmware_pass").val($('#known_hosts_select option:selected').attr('pass'));
});

$(function() {
    $('#submit_form').click(function() {
        // start showing loading animation
        $.LoadingOverlay("show", {
                        image       : "",
                        fontawesome : "fa fa-cog fa-spin"
                        })
        $.ajax({
            url: window.location.pathname, // url: /vmware/get_vmrc_links
            data: $('form').serialize(),
            type: 'POST',
            success: function(response) {
                $.LoadingOverlay("hide");
                if (response.error != "") {
                    $('#output_div').HTML(response.error)
                } else {
                    $('#output_div').HTML(response.collected_vm_info)
                }
            }
        });
    });
});
String data: $('form').serialize() produces a string of serialized data with all <form>'s input elements IDs and their values. Along with serialization task, this JS file contains additional things like showing "Loading" overlay and filling the inputs with the predefined data from select object.
Sending serialized data to the back-end#
Serialized data goes via POST method to the back-end via an url you specify.
/scripts_bank/vmware/get_vmrc_links/static/get_vmrc_links_scripts.js:
$.ajax({
            url: newPathname + '/get_vmrc_links', // url: /vmware/get_vmrc_links
            data: $('form').serialize(),
            type: 'POST',
Receiving data by the back-end and processing#
To receive serialized data you need to create a POST requests handler:
# /scripts_bank/vmware/get_vmrc_links/get_vmrc_links.py
@get_vmrc_links_bp.route('/get_vmrc_links', methods=['GET','POST'])
def get_vmrc_links():
    if request.method == 'GET':
        return render_template('get_vmrc_links.html')

    # handle POST method from JQuery
    elif request.method == 'POST':
        getvmrc_args = {'host': request.form['vmware_ip_addr'],
                        'user': request.form['vmware_login'],
                        'pass': request.form['vmware_pass']}
To get the contents arrived in POST I queried form data structure of the request object with appropriate keys. form[] object is an ImmutableDict data structure which contains all the data received in the POST method:
ImmutableMultiDict([('vmware_pass', 'mypass'), ('vmware_ip_addr', '172.17.255.253'), ('vmware_login', 'root')])
Once you received your inputs you pass it along to the main function of the chosen script to process. Here I should mention that you have two ways of generating output data:
- you could leave it in plain text and wrap it in the appropriate
HTMLtags with Flask - or you could enclose scripts' output data in
HTMLtags during scripts execution process
In this example with the get_vmrc_links.py script I chose the latter option and wrapped the whole output of the script (which normally would have found it's peace in stdout) with HTML tags:
# /scripts_bank/vmware/get_vmrc_links/get_vmrc_links.py
<... omitted ...>

vmrc_links['collected_vm_info'] += "<p><pre>" # opening paragraph and preformatted section
vmrc_links['collected_vm_info'] += "<strong>Name       : " + vm_summary.config.name + "</strong></br>"
vmrc_links['collected_vm_info'] += "Path       : " + vm_summary.config.vmPathName + "</strong></br>"

<... omitted ...>
See these <pre>, <p> and <strong> tags I used? It'd done exactly to get rich formatting.
Passing the results back to the front-end#
One of the goals of this project was to make script's output look more readable. Thanks to modern front-end techniques and frameworks you could render whatever/however you like, your skills are the limit. At this time, my scripts produce just some text which I can render in various ways with HTML. But how do I actually pass this data to the front-end engine and in a what form?
I pass it as JSON-formatted structure composed in a two-step process:
Firstly, I collected scripts output data as a dict with the keys representing output data and errors (if any):
Once I have a dict with results and errors to show I use Flask's jsonify function to represent my dict as JSON and compose a Response object to pass it further to the front-end:
    <... omitted ...>

    elif request.method == 'POST':
            getvmrc_args = {'host': request.form['vmware_ip_addr'],
                            'user': request.form['vmware_login'],
                            'pass': request.form['vmware_pass']}

            global vmrc_links
            vmrc_links = {'collected_vm_info': '',
                        'error': ''}

            vm_info = main(getvmrc_args)
            return jsonify(vm_info)
And that's it. Now fast forward to the front-end and see how it processes received data:
/scripts_bank/vmware/get_vmrc_links/static/get_vmrc_links_scripts.js:
$(function() {
    $('#submit_form').click(function() {
        // start showing loading animation
        $.LoadingOverlay("show", {
                        image       : "",
                        fontawesome : "fa fa-cog fa-spin"
                        })
        $.ajax({
            url: window.location.pathname, // url: /vmware/get_vmrc_links
            data: $('form').serialize(),
            type: 'POST',
            success: function(response) {
                $.LoadingOverlay("hide");
                if (response.error != "") {
                    $('#output_div').HTML(response.error)
                } else {
                    $('#output_div').HTML(response.collected_vm_info)
                }
            }
        });
    });
});
On a successful return, I check if output has any errors and if it has - put an error message in the #output_div block. If things went smooth I put collected results in this block instead.
Adding new script is easy#
Create the file structure#
It's very easy to add a new script. Walk with me and see how easily I add completely separate script called SAM-O XML API Tester.
At first, I created directories which represent sandbox for the script in a folder dedicated to storing scripts (scripts_bank). As I said, my directory structure follows my side-menu bar, that's why for the new script called SAM-O_XML_API_Tester I first off created root directory 5620sam and then subdirectory SAM-O_XML_API_Tester. The latter dir will carry all files related to this particular script.
Do not forget to create empty __init.py__ files inside directories of the script to treat folders as python packages.
.
├── scripts_bank
│  ├── _5620sam
│  │  ├── sam_xml_api_tester
│  │  │  ├── __init__.py
│  │  │  ├── static
│  │  │  └── templates
│  │  └── __init__.py
│  ├── __init__.py
Create HTML files#
Now it's user-facing HTML template's turn. I created sam-o_xml_api_tester.html file in SAM-O_XML_API_Tester/templates dir leveraging sandbox environment. See, this makes individual script management very convenient, one directory stores em all.
Following inheritance model this template inherits markup from the content-template.html. As I explained earlier it makes easier to fill in general text information (such as a name of the script, usage guide, author info, etc). Consider this as static or temporary layout for almost every new script.
/scripts_bank/5620sam/SAM-O_XML_API_Tester/templates/sam-o_xml_api_tester.html:
{% extends 'content_template.html' %}
{% block title %}
    New script
{% endblock %}

{% block main_purpose %}
This is just demo for the blog.
{% endblock %}

{% block descr %}
Description TBD...
{% endblock %}

{% block usage %}
It does nothing, <mark>for now</mark>
{% endblock %}

{% block limitations %}
My code does not have limitation!
{% endblock %}

{% block author %}
Roman Dodin
{% endblock %}

{% block version %}
0.1
{% endblock %}

{% block tags %}
noshut.ru
{% endblock %}

{% block script_content %}

<div class="container-fluid">
    <div class="row">
        <div class="col-md-12">
            <div class="panel panel-default">
                <div class="panel-heading">
                    <h3 class="panel-title">Inputs</h3>
                </div>
                <div class="panel-body">
                </div>
            </div>

            <div class="panel panel-default">
                <div class="panel-heading">
                    <h3 class="panel-title">Output</h3>
                </div>
                <div class="panel-body" id="output_div">
                </div>
            </div>
        </div>
    </div>
</div>
{% endblock %}
{% block added_js %}
<!-- nothing here for the moment -->
{% endblock %}
Create & register a Blueprint#
Now it's time to write few lines for back-end part. Create a python file which will hold blueprint for this script we've been adding and back-end activities:
#/scripts_bank/_5620sam/sam_xml_api_tester/sam_xml_api_tester.py
from flask import render_template, request, Blueprint, jsonify

###############
#### FLASK ####
###############

sam_api_tester_bp = Blueprint('sam_api_tester', __name__, template_folder='templates', static_folder='static',
                              static_url_path='/sam_xml_api_tester/static')

@sam_api_tester_bp.route('/sam_xml_api_tester', methods=['GET','POST'])
def sam_api_tester():
    if request.method == 'GET':
        return render_template('sam_xml_api_tester.html')

    # handle POST method from JQuery (will be filled later)
    elif request.method == 'POST':
        return 0
Register it in the main app.py:
from scripts_bank._5620sam.sam_xml_api_tester.sam_xml_api_tester import sam_api_tester_bp
app.register_blueprint(sam_api_tester_bp, url_prefix='/5620sam')
And you are good to go!
How to test PLAZA?#
Apart from traditional way of cloning a repo and building a virtual environment, you can use a docker container.
What's next?#
Tons of useful things are missing at the moment - no search, no active tags, no login-based system, no tests, etc. I will probably add some of this features later, but you are welcome to suggest, blame, and pull-request. Yeah, the code as is can be grabbed from GitHub.